
Welcome back, hopefully you’ve read part 1 of this post, if not you can find it here: Use HTTP Callouts in Flow to send SMS via Esendex – Part 1
In that we covered how to set up the External Service and Named Credentials and how to give the users access to these to use in your flow.
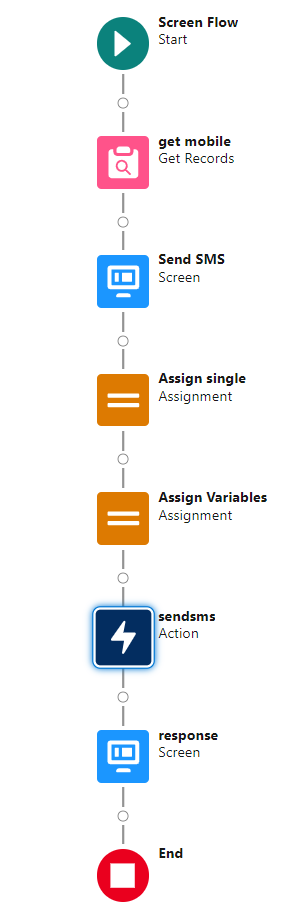
So to the flow itself:
I’ve built this for demo purposes as a simple screen flow and put it on my contact record.
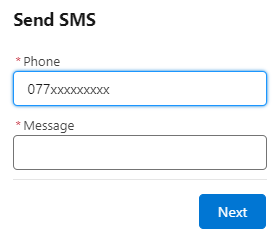
2 fields, phone number so you can check its correct and Message to free type what you want to say

Lets start by taking a look at the Esendex message dispatcher API.

This is everything additional to the Authentication that we need to send them, We’ve already taken care of the Content-Type and Accept in the Named Credentials. (see Part 1)
We still need to pass the account reference and the message recipient(to) and the message(body).
You can if you want and need pass multiple to and body values, a collection if you will all at the same time. Esendex can accept up to 50,000 at one time if you need it to.
So back in the flow, we’ve grabbed the contact record that we are on’s Mobile number in the Get Mobile element,

We’ve presented a screen to enter the message

I’ve used a phone element from the standard components for a screen flow and set the default value as the mobile number from the get request.

As you can see in the flow above we’re going to need to assign some values, but what are we assigning them to? First we need to skip ahead slightly and build the Send SMS action.
Click to add a new element and select the Action option

Now we’ll create the HTTP Callout

Give it a name and description that is meaningful, I’m calling it SendSMS, the Esendex API has a number of different end points for different functions so lets make the name useful for later and then select the Named Credential that we created in Part 1, in my case this is Esendex.

Next we provide a little more description for the Call out, we select the Method, which in the instance of this Esendex End point is POST and the end point of the end point in this case /messagedispatcher as we included the start of the URL in the Named Credential.


We don’t need to include any additional Query Parameter keys.
Now this is where the magic starts, Salesforce needs to know the Json that it should be using to send the request, so we just copy the Json into the field and hit review.
{
"accountreference":"EX0000000",
 "messages":[
{
"to":"447700900123",
 "body":"Every message matters!"
}]
}
And its already worked out what the types are for the fields

Now we are going to do the same for the Response that Salesforce is to expect.
Because I’ve been using the samples from the Esendex documentation, and didn’t add my accounts EX reference to the Request sample, I’m using the Use Example Response.
If you choose Connect for Schema, and don’t enter your EX reference to the sample, Esendex will return an error.

Again copy the sample from the Esendex site.
{ "batch":
 { "batchid": "19aafc9c-b08a-400d-a9f1-afe3c46f0a25", "messageheaders": [
{ "uri": "http://api.esendex.com/v1.0/messageheaders/72d91006-eb01-4e69-ae98-0e02c92c8e34",
 "id": "72d91006-eb01-4e69-ae98-0e02c92c8e34" } ]
},
"errors": null }
And it’ll have a go at setting the types, the only one it will struggle with this time is Errors because it is null in the example, so set this to String.


We’re nearly done with this wizard, one last thing to do is create the Variable which we will assign the request body to when ready to send.
Don’t confuse this with the body used in the Esendex request that is the body of the message, here we mean the whole set of data we are sending to Esendex.

As you normally would, click in the field and select New Resource, give it a Name and a description, everything else is completed for you.


If you want to you can select the Manually assign variables for capturing the responses, I’ve left it un checked for now, I imagine I might need these when I come to use this in production.

Now this is where is gets a little tricky, Salesforce has created all the apex that we need in the background, however some of it we can’t see.
If right now you go to create a new assignment, you’ll see that some variables already exist.
The output variable exists and it has an Arrow, so you can drill deeper and so does SMS Body.
But it only allows you to the top level of the nested array (Collection) of the body messages not the message


So we need to create a new variable.
New Resource > Variable
Select your API name
And for Data Type select Apex Defined, and now a new field appears to select the apex class, when you click in it will show all the classes available, scroll down, the one you need, will start with ExternalService and then has the API names that you gave when you created the Action earlier. And then the rest we are looking for is IN_body_messages
You can see mine in the image below

Now when we try to assign to variables we can see inside the nested array.


So now we can assign the values from the Screen to the single variables.

And then our account reference and our single message to our messages variable.

Add a final confirmation screen for you users outputting response code from Esendex, the Batch id if you need it, and any errors.

And now when you run the flow from your page layout like I have your SMS is sent.
This is the simplest send I could think of, in a production environment you might want to do more with dynamically sending the SMS, so you might want to start from a Record Trigger Flow rather than a Screen flow.
You might, and I suspect I will, want to create an object to record the Esendex batch id’s and the message id’s of the messages sent.
And remember that the Esendex API can accept up to 50,000 messages in a single batch, just by passing multiple copies of what I called the single message into the SMSbody. Think of the single message as a Record and the batch as a Collection. (Let me know in the comments if you’d like a walk through of this)
So thats it, how to send an SMS via Esendex in 2 hopefully easy parts, This was the first time I’ve used the HTTP Callout feature and I loved how easy it was to use with a Rest API. I hope it helps!


[…] Part 2 we’ll look at how to use the HTTP Callout to access to the Esendex […]